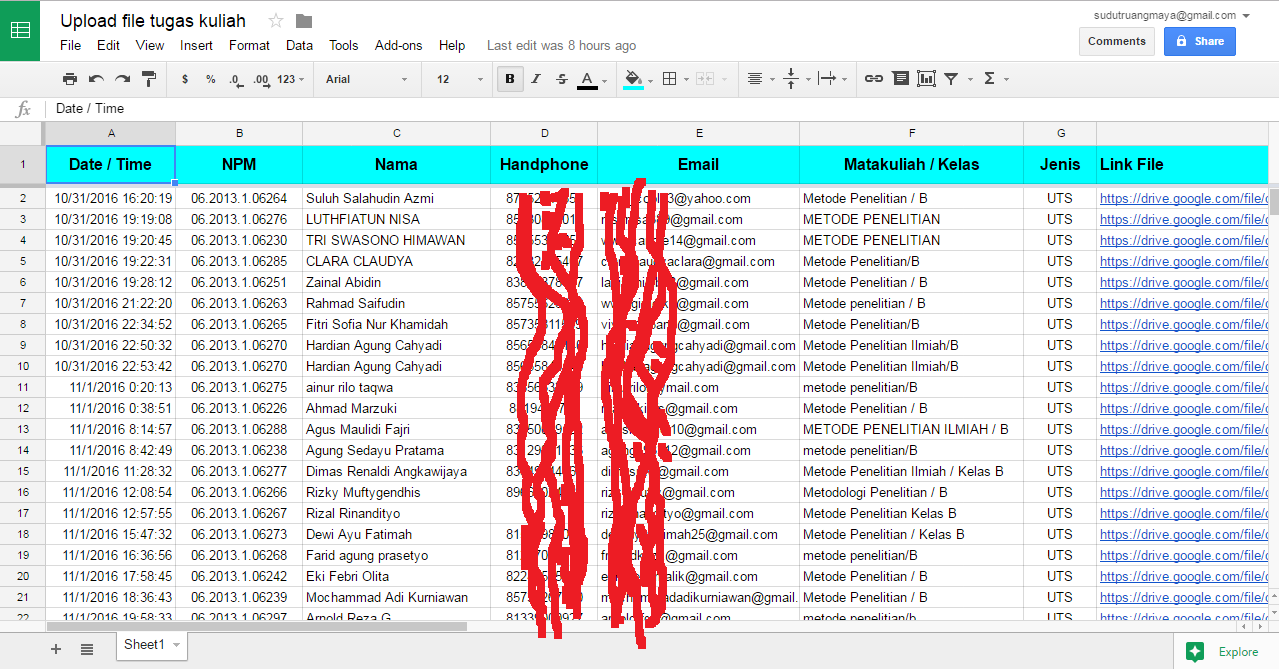
Dalam proses pembelajaran di kampus seringkali dosen memberi tugas kepada mahasiswa dan hasilnya dikirim melalui email, kemudian dosen mengunduh file tugas tersebut satu persatu. Jika mahasiswa yang diampu jumlahnya tidak terlalu banyak mungkin tidak masalah, tapi jika jumlahnya sampai ratusan akan jadi pekerjaan yang kurang efektif. Memanfaatkan aplikasi yang disediakan oleh Google Drive dan Sheet merupakan salah satu cara untuk memanajemen file tugas dari mahasiswa. Data dan file tugas yang dikirim oleh mahasiswa akan langsung masuk ke Google sheet dan drive lewat Form Upload seperti contoh tampilan dibawah ini.


Denga cara diatas akan lebih mudah memanajemen file tugas dan identitas mahasiswa yang sudah mengumpulkan atau telat melebihi waktu yang ditentukan dosen pengampu.
Berikut adalah langkah-langkah pembuatannya :
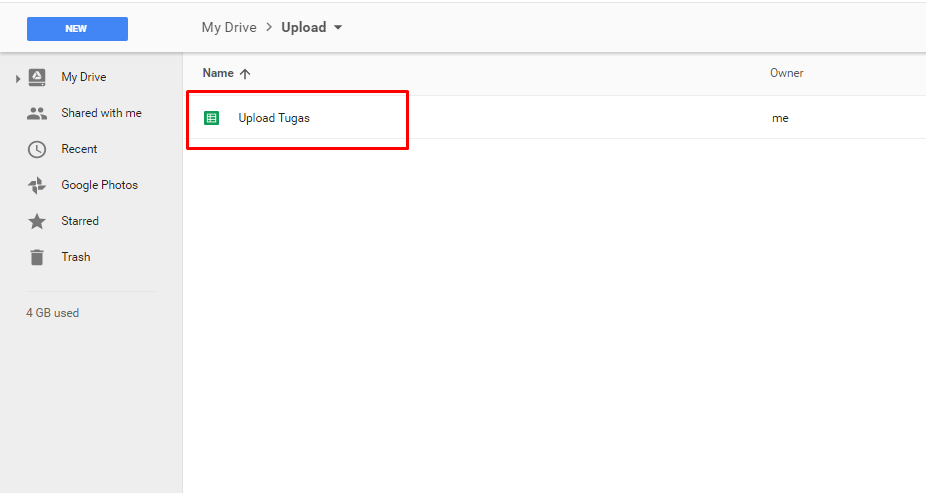
- Login dan masuk ke Google Drive dan buat folder baru, misal nama foldernya “Upload”.
 2. Masuk kedalam folder “Upload” yang baru saja dibuat dan buatlah file sheet baru, misal nama filenya “Upload Tugas”
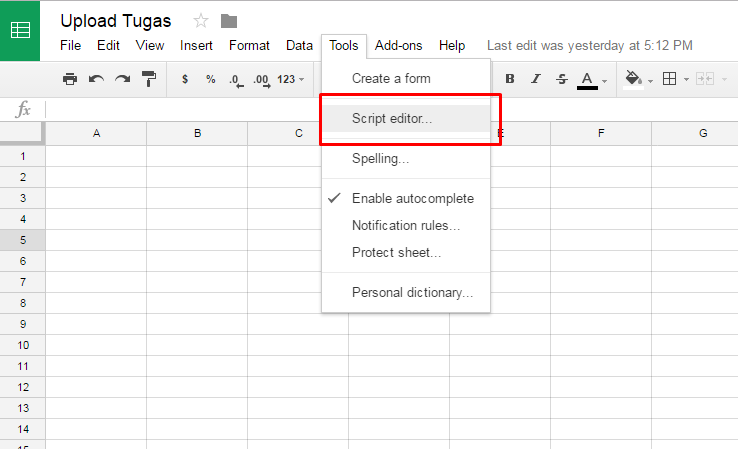
3. Buka kembali file sheet yang baru saja dibuat dan pilih file menu Tool > Script editor…
4. Akan tampil halaman “Untitled project”, sekalian anda rubah nama projectnya, misal “Upload Tugas Kuliah”.

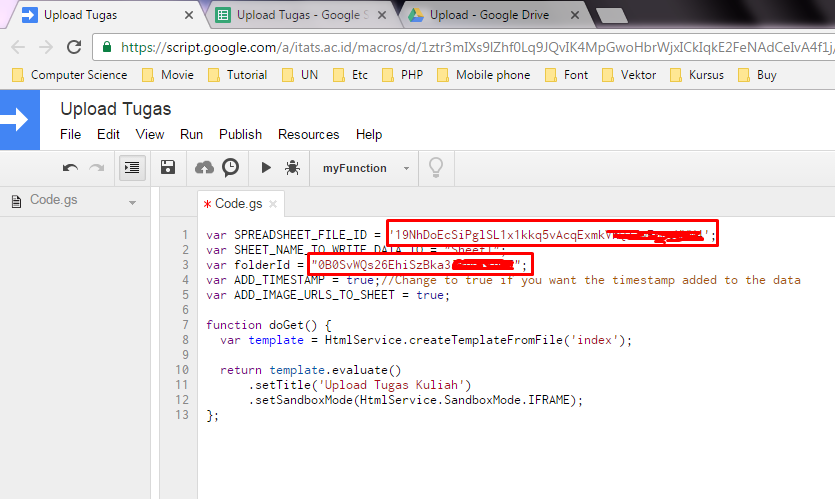
5. Ubah isi script code.gs seperti dibawah ini.
var SPREADSHEET_FILE_ID = 'xxx';
var SHEET_NAME_TO_WRITE_DATA_TO = "Sheet1";
var folderId = "xxx";
var ADD_TIMESTAMP = true;
var ADD_IMAGE_URLS_TO_SHEET = true;function doGet() {
var template = HtmlService.createTemplateFromFile('index');return template.evaluate()
.setTitle('Upload Tugas Kuliah')
.setSandboxMode(HtmlService.SandboxMode.IFRAME);
};
Dari script diatas, ganti “xxx” pada var SPREADSHEET_FILE_ID dan var folderId dengan id file sheet dan folder drive yang anda buat sebelumnya. Untuk mengetahui id file sheet dan folder drive dengan melihat URL pada browser addres, seperti tampilan dibawah ini. 

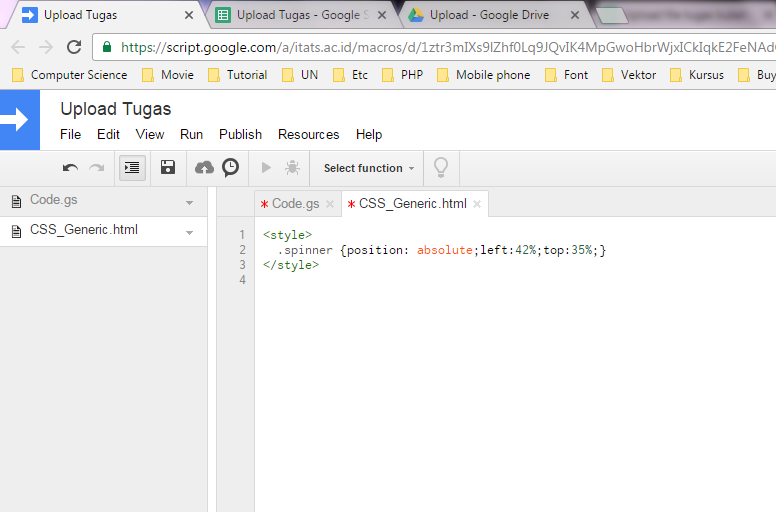
6. Buat file Html baru melalui menu File > New > Html file. Beri nama “CSS_Generic” dan ubah isi scriptnya seperti tampilan dibawah ini.
7. Buat file Html baru lagi melalui menu File > New > Html file. Beri nama “CSS_Main_Form” dan ubah isi scriptnya seperti dibawah ini.
<style type="text/css">

#msgToUsr {
position: absolute;
left: 30%;
width: 40%;
background-color: white;
border: 2px solid red;
text-align: center;
display:none;
}

#titleOfForm {
display: block;
margin-left: auto;
margin-right: auto;
margin-bottom: 6px;
width:488px;
height:40px;
border: solid 1px lightgray;
border-radius: 5px;
background: #73AD21;
padding: 12px;
text-align:center;
}

img {
display: block;
margin-left: auto;
margin-right: auto;
width:500px;
height:170px;
}

form {
width:450px;
padding:30px;
margin: auto;
background: #FFF;
border-radius: 10px;
-webkit-border-radius:10px;
-moz-border-radius: 10px;
box-shadow: 0px 0px 10px rgba(0, 0, 0, 0.13);
-moz-box-shadow: 0px 0px 10px rgba(0, 0, 0, 0.13);
-webkit-box-shadow: 0px 0px 10px rgba(0, 0, 0, 0.13);
}

h2 {
width:450px;
padding:30px;
margin: auto;
margin-top: 5px;
margin-bottom: 10px;
text-align: center;
border-radius: 10px;
background: #FF8500;
color: #fff;
box-shadow: 1px 1px 4px #DADADA;
-moz-box-shadow: 1px 1px 4px #DADADA;
-webkit-box-shadow: 1px 1px 4px #DADADA;
border-radius: 10px;
-webkit-border-radius: 10px;
-moz-border-radius: 10px;
}

h1 {
background: #2A88AD;
padding: 20px 30px 15px 30px;
margin: -30px -30px 30px -30px;
border-radius: 10px 10px 0 0;
-webkit-border-radius: 10px 10px 0 0;
-moz-border-radius: 10px 10px 0 0;
color: #fff;
text-shadow: 1px 1px 3px rgba(0, 0, 0, 0.12);
font: normal 30px 'Bitter', serif;
-moz-box-shadow: inset 0px 2px 2px 0px rgba(255, 255, 255, 0.17);
-webkit-box-shadow: inset 0px 2px 2px 0px rgba(255, 255, 255, 0.17);
box-shadow: inset 0px 2px 2px 0px rgba(255, 255, 255, 0.17);
border: 1px solid #257C9E;
}

h1 > span {
display: block;
margin-top: 2px;
font: 13px Arial, Helvetica, sans-serif;
}

label {
display: block;
font: 13px Arial, Helvetica, sans-serif;
color: #888;
margin-bottom: 15px;
}

input[type="text"],
input[type="email"],
input[type="file"],
textarea,
select {
display: block;
box-sizing: border-box;
-webkit-box-sizing: border-box;
-moz-box-sizing: border-box;
width: 100%;
padding: 8px;
outline: none;
border: 1px solid #B0CFE0;
-webkit-transition: all 0.30s ease-in-out;
-moz-transition: all 0.30s ease-in-out;
-ms-transition: all 0.30s ease-in-out;
-o-transition: all 0.30s ease-in-out;
}

section{
font: normal 20px 'Bitter', serif;
color: #2A88AD;
margin-bottom: 5px;
}

section span {
background: #2A88AD;
padding: 5px 10px 5px 10px;
position: absolute;
border-radius: 50%;
-webkit-border-radius: 50%;
-moz-border-radius: 50%;
border: 4px solid #fff;
font-size: 14px;
margin-left: -45px;
color: #fff;
margin-top: -3px;
}

input[type="button"],
input[type="submit"]{
background: #2A88AD;
padding: 8px 20px 8px 20px;
border-radius: 5px;
-webkit-border-radius: 5px;
-moz-border-radius: 5px;
color: #fff;
text-shadow: 1px 1px 3px rgba(0, 0, 0, 0.12);
font: normal 30px 'Bitter', serif;
-moz-box-shadow: inset 0px 2px 2px 0px rgba(255, 255, 255, 0.17);
-webkit-box-shadow: inset 0px 2px 2px 0px rgba(255, 255, 255, 0.17);
box-shadow: inset 0px 2px 2px 0px rgba(255, 255, 255, 0.17);
border: 1px solid #257C9E;
font-size: 15px;
}
input[type="button"]:hover,
input[type="submit"]:hover{
background: #2A6881;
-moz-box-shadow: inset 0px 2px 2px 0px rgba(255, 255, 255, 0.28);
-webkit-box-shadow: inset 0px 2px 2px 0px rgba(255, 255, 255, 0.28);
box-shadow: inset 0px 2px 2px 0px rgba(255, 255, 255, 0.28);
}

</style>
8. Buat file google script baru melalui menu File > New > Script file. Beri nama “GS_Process_Data” dan ubah isi scriptnya seperti dibawah ini.
function processForm(theForm) {
  var allTheData,doc,fileBlob,folder,sheet,targetRange,template;
  var npm,name,handphone,email,mkkelas,jenis;
  var fileUrl;
  var arrayOfNamesToWriteToSS,i,L,outerArray,innerArray,thisKey,TS;
  //Logger.log(theForm);

  arrayOfNamesToWriteToSS = ['npm','name','handphone','email','mkkelas','jenis'];
  L = arrayOfNamesToWriteToSS.length;

  fileBlob = theForm.myFile1;


  Logger.log(fileBlob)


  if (folderId) {
    folder = DriveApp.getFolderById(folderId);
  } else {
    folder = DriveApp.getRootFolder();
  };

  if (fileBlob.name) {doc = folder.createFile(fileBlob);  fileUrl = doc.getUrl();};

   template = HtmlService.createHtmlOutputFromFile('HTML_Feedback').getContent();

  allTheData = "";
  innerArray = [];

  if (ADD_TIMESTAMP) {
    TS = new Date();
    innerArray.push(TS);
  };

  for (i=0;i<L;i+=1) {
    thisKey = arrayOfNamesToWriteToSS[i];
    allTheData = allTheData + theForm[thisKey] + " <br>";
    innerArray.push(theForm[thisKey]);
  };

  outerArray = [];
  outerArray.push(innerArray);

  //Logger.log('theForm.name: ' + theForm.name);
  template = template.replace('11111_PutTheDataHere_22222',allTheData);

  if (ADD_IMAGE_URLS_TO_SHEET) {
    if (fileUrl) innerArray.push(fileUrl);

  };

   if (!SPREADSHEET_FILE_ID) {return ['err','No Spreadsheet ID',template]};

  sheet = SpreadsheetApp.openById(SPREADSHEET_FILE_ID).getSheetByName(SHEET_NAME_TO_WRITE_DATA_TO);
  sheet.appendRow(innerArray);

  return template;
}
9. Buat file Html dengan nama “HTML_Body” dan ganti isi scriptnya seperti dibawah ini :
<div id="formDiv">
<!-- Form div will be hidden after form submission -->
<!--  <img src="data:image/jpeg;base64,/9j/4AAQSkZJRgABAQEAYABgAAD/4QAiRXhpZgAATU/AMS///9k=">  -->


<div id="msgToUsr"></div>

<form id="myForm">
<h1>Form Upload Tugas Kuliah<span>Isi semua data dengan benar dan ubah nama file sesuai format.</span></h1>

    NPM : <input type="text" name="npm" onchange="clearIt(this)" placeholder="Nomor identitas mahasiswa"/><br/>
    Nama lengkap : <input type="text" name="name" onchange="clearIt(this)" placeholder="Nama depan dan belakang"/><br/>
    No. Handphone : <input type="text" name="handphone" onchange="clearIt(this)" placeholder="Nomor handphone yang bisa dihubungi"/><br/>
    Email : <input type="email" name="email" placeholder="Alamat email yang aktif digunakan"/><br/>
    Mata Kuliah / Kelas : <input type="text" name="mkkelas" onchange="clearIt(this)" placeholder="Nama mata kuliah dan kelas yang diambil"/><br/>


    Jenis file : <select name="jenis" onchange="clearIt(this)">
    <option>UTS</option>
    <option>UAS</option>
    <option>Tugas 1</option>
    <option>Tugas 2</option>
    <option>Tugas 3</option>
     <option>Kuis 1</option>
    <option>Kuis 2</option>
    <option>Kuis 3</option>
    <option>Lainnya</option>
     </select><br/>

     Upload file (pdf/docx/xlsx/jpg/dll) : <input type="file" name="myFile1" onchange="clearIt(this)"/><br/>

    <input type="button" value="Kirim" onmouseup="submitForm(this.parentNode)" /><br/>
</form>

</div>

<div id="inProgress" style="display: none;">
<!-- Progress starts hidden, but will be shown after form submission. -->
Proses upload. Mohon ditunggu sebentar...
</div>

<div id="output">
  <!-- Blank div will be filled with "Thanks.html" after form submission. -->
</div>
10. Buat file html dengan nama “HTML_Feedback” dan ganti isi scriptnya seperti dibawah ini :
<div>
    <h2>.:: Selesai ::.<br><br/> 11111_PutTheDataHere_22222 <br><br/>Data anda sudah terkirim.</h2>
</div>
11. Buat file html dengan nama “JS_Library” dan ganti isi scripnya seperti dibawah ini :
<script>
window.AlanWells_shwSpnr = function(a,b) {
//console.log('a: ' + a)
  AlanWells_displayinline(a);
  var daSpinHtml = '<div><img src="http://www.fairfieldelections.com/images/load_fancy.gif" alt="Smiley face" height="42" width="42"></div>';
  AlanWells_inHtml(a,daSpinHtml);
};

window.AlanWells_hideSpnr = function(a,b) {
  AlanWells_inHtml(a,"");//If spinner was displayed, make sure it gets turned off
  AlanWells_hide(a);
};

window.AlanWells_displayinline = function(a) {
  document.getElementById(a).style.display = "inline";
};

window.AlanWells_inHtml = function(a,b) {
  document.getElementById(a).innerHTML = b;
};

window.AlanWells_hide = function(a) {
  document.getElementById(a).style.display = "none";
};
</script>
12. Buat file html dengan nama “JS_Main_Form” dan ganti isi scriptnya seperti dibawah ini :
<script>
  window.clearIt = function(thisEl) {
    document.getElementById('msgToUsr').style.display = 'none';
    thisEl.style.backgroundColor = "";
  };

  window.submitForm = function(myForm) {
    var key,value,requiredList=[],nameName,thisEl,errElmt,inputType,die;
    die = false;

    requiredList = ['npm','name','myFile1'];//This is a list of the names of questions that must be filled out

    for (key in myForm) {
      /*console.log('key: ' + key);
      console.log('value: ' + myForm[key]);

      console.log('value: ' + myForm[key].value);
      console.log(myForm[key].value === "");
  */
      thisEl = myForm[key];
      if (thisEl===null) continue;

      nameName = thisEl.name;
      if (requiredList.indexOf(nameName) === -1) {continue;};//If the name is not in the required list

      value = thisEl.value;
      inputType = thisEl.type;


      /*console.log('inputType: ' + inputType);
      console.log('value: ' + value);
      console.log('name: ' + nameName);

      console.log(value === "");
      */
      if (value === "") {
        //console.log('inside if block')
        //console.log(requiredList.indexOf(nameName) === -1);

        if (requiredList.indexOf(nameName) === -1) {continue;};//If the name is not in the required list
        die = true;
        //then it's not required, keep on checking other entries
        toggle_visibility('inProgress');
        toggle_visibility('formDiv');

        thisEl.style.backgroundColor = "red";//Turn the background red
        thisEl.focus();//Move focus to the element with missing data
        window.scrollTo(0,0);//Scroll to the top
        errElmt = document.getElementById('msgToUsr');
        errElmt.textContent = "Semua data harus diisi lengkap!  klik pesan ini untuk menutup";
        errElmt.style.display = 'inline-block';
        errElmt.style.top = "45%";
        errElmt.addEventListener("click", function(){
          this.style.display = "none";});
      };
    };

    //console.log('right before google.script.run');
    //console.log(die);

    if (die) return;

    toggle_visibility('formDiv');
    toggle_visibility('inProgress');
    AlanWells_shwSpnr('idSpnr');

    google.script.run
      .withSuccessHandler(updateOutput)
      .processForm(myForm)

  };

  // Javascript function called by "submit" button handler,
  // to show results.
  function updateOutput(dataReturned) {
    var html,outputDiv;

    console.log('dataReturned: ' + dataReturned);
    console.log('typeof dataReturned: ' + typeof dataReturned);

    if (typeof dataReturned === 'object') {
      html = "<div>Data was not saved to spreadsheet</div><div>No Spreadsheet ID is set</div>" + dataReturned[2];
    } else {
      html = dataReturned;
    };
    toggle_visibility('inProgress');
    outputDiv = document.getElementById('output');
    outputDiv.innerHTML = html;
    AlanWells_hideSpnr('idSpnr');
  }

  // From blog.movalog.com/a/javascript-toggle-visibility/
  function toggle_visibility(id) {
    var e;
    //console.log('toggle_visibility ran' + id);

    e = document.getElementById(id);
    if(e.style.display !== 'none')//Modified this line
      e.style.display = 'none';
    else
      e.style.display = 'block';
  }

  /* I modified the code for the function named toggle_visibility

    if(e.style.display !== 'none')//Modified this line

  Was:

    if(e.style.display === 'block')
    The style could be many different settings. If it's inline for example, then that would break the code.
    But if it's !== "none", then if it's anything but none, then it's obviously being displayed.
  */
</script>
12. Buat file html dengan nama “index” dan ganti isi scriptnya seperti dibawah ini :
<!DOCTYPE html>
<html>
  <head>
    <base target="_top">
    <link href='http://fonts.googleapis.com/css?family=Bitter' rel='stylesheet' type='text/css'>
    <!-- Use a templated HTML printing scriptlet to import stylesheet -->
    <?!= HtmlService.createHtmlOutputFromFile('CSS_Main_Form').getContent(); ?>
    <?!= HtmlService.createHtmlOutputFromFile('CSS_Generic').getContent(); ?>
  </head>
  <body>
    <?!= HtmlService.createHtmlOutputFromFile('HTML_Body').getContent(); ?>
  </body>

  <!-- Use a templated HTML printing scriptlet to import JavaScript. -->
  <?!= HtmlService.createHtmlOutputFromFile('JS_Main_Form').getContent(); ?>
  <?!= HtmlService.createHtmlOutputFromFile('JS_Library').getContent(); ?>

  <div id="idSpnr" class="spinner"></div>
</html>
13. Tampilan akhir penambahan script seperti dibawah ini :

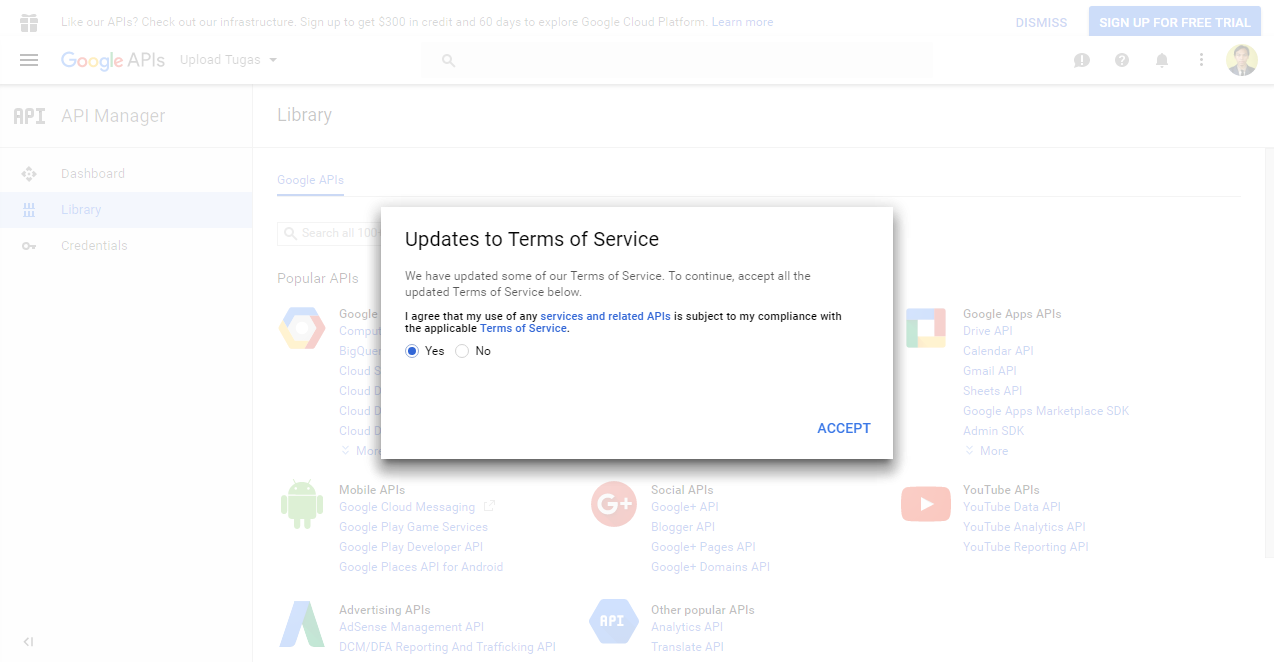
14. Kemudian klik file menu Resource > Developers Console Project… akan tampil seperti dibawah ini. Klik nama projectnya, akan tampil halaman API. 15. Jika muncul tampilan “Update to Terms of Service” pilih yes dan Accept.
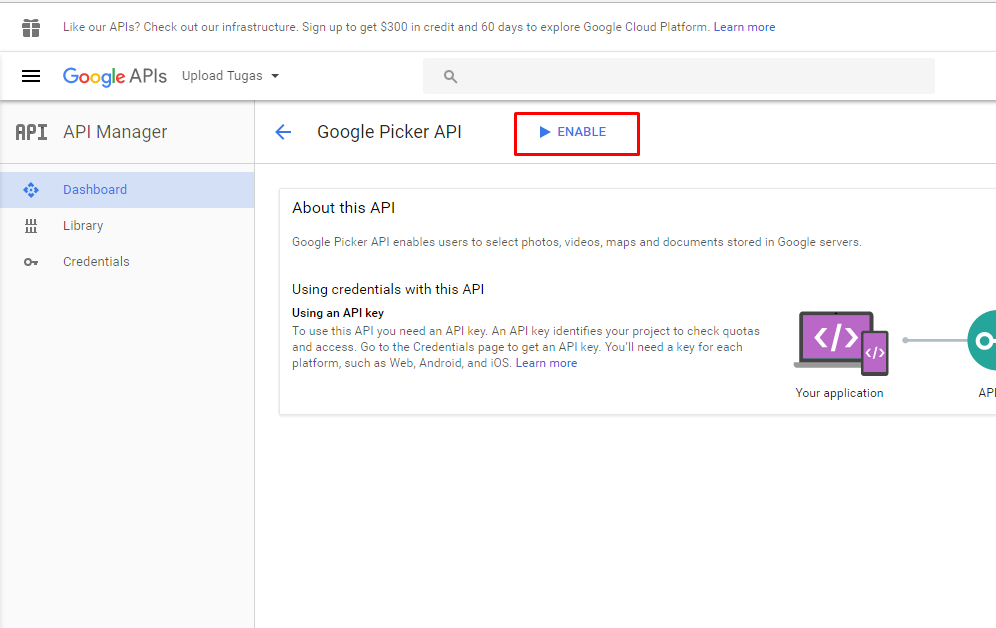
16. Ketik “Picker” dalam kotak pencarian dan klik “Google Picker API”

17. Pilih “Enable”, jika API sudah aktif, kembalilah ke halaman Project dan tutup window “Developer Console Project”.
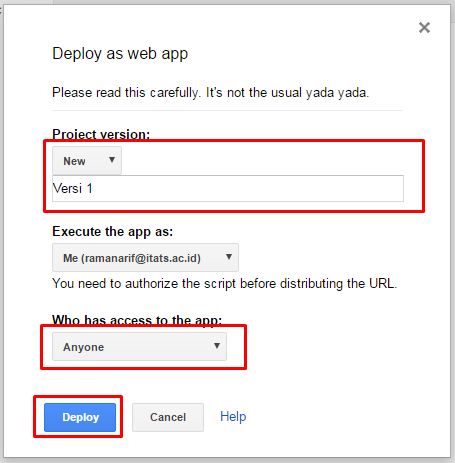
18. Klik file menu Publish > Deploy as web app…

19. Isi project version misal “Versi 1”, atur hak akses menjadi “Anyone”, klik “Deploy”
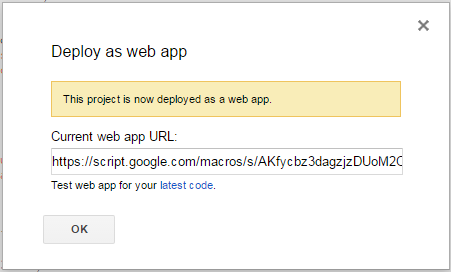
20. Copy link address “Current web app URL”, klik ok. Buka url di tab browser yang baru.
21. Jika semua langkah dilakukan tanpa ada yang salah, maka akan tampil halaman “Form Upload Tugas” seperti contoh dibagian atas tutorial ini. Ujicobalah dengan mengisi semua data yang ada dan upload file dengan ekstensi apa saja, misal file Jpg, Pdf, docx, xlsx dll. Kemudian cek hasil file dan data yang masuk ke drive dan sheet.
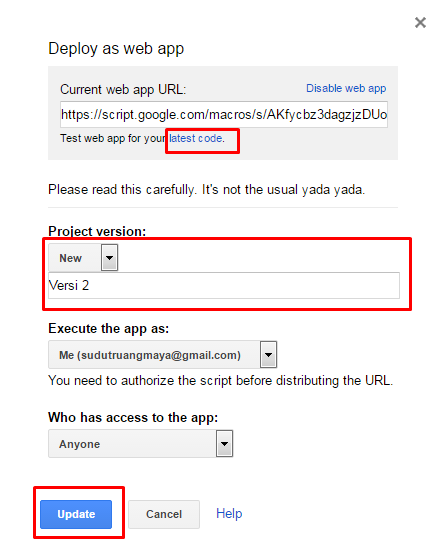
22. Semua script atau kode dalam project bisa dimodif sesuai kebutuhan yang diinginkan. Setelah dilakukan perubahan pada script jangan lupa disave dan diupdate lewat file menu Publish > Deploy as web app, ganti versinya lalu update. Url aplikasi tetap sama tidak ada perubahan. Jika kita belum yakin dengan perubahan yang dibuat, bisa dilakukan testing terlebih dahulu sebelum diupdate dengan cara klik “Latest code” seperti tampilan dibawah ini.
23. Untuk lebih mudah diakses, Url addres Form Upload yang cukup panjang bisa diperpendek mengunakan http://s.id atau http://gg.gg
23. SELESAI. dan semoga bermanfaat.